
Reinstalling Windows is usually straightforward until you discover that your network adapter, graphics card, or chipset drivers are missing. Without the correct drivers, Windows may not recognize your hardware, leaving you without internet access or reduced system performance.
Fortunately, Windows includes built-in tools that let you export your current drivers and inject them directly into a Windows installation image. The result is a custom Windows ISO that automatically installs your drivers during Windows Setup.
This is especially useful if you regularly reinstall Windows on the same computer or deploy Windows to multiple machines with identical hardware.
In this guide, you’ll learn how to:
- Back up all third-party drivers
- Add them to a Windows installation image
- Rebuild a bootable Windows ISO
- Test the ISO before installing Windows
What You’ll Need
Before starting, make sure you have:
- A Windows 10 or Windows 11 ISO downloaded from Microsoft’s official website
- Administrator privileges
- PowerShell
- DISM (included with Windows)
- ImgBurn (used to rebuild the bootable ISO)
- VMware or VirtualBox for testing (recommended)
Step 1: Create Your Workspace
Keeping everything organized makes the process much easier.
Open File Explorer and create the following folder structure on your C: drive:
C:\WorkSpace
├── ISO
├── Mount
└── Drivers
Each folder has a specific purpose:
- ISO stores the extracted Windows installation files.
- Mount is a temporary folder where DISM mounts the Windows image.
- Drivers stores your exported drivers.
Important: The Mount folder must remain completely empty before mounting an image.
Step 2: Back Up Your Current Drivers
Open PowerShell as Administrator and run:
Export-WindowsDriver -Online -Destination "C:\WorkSpace\Drivers"Windows scans your current installation and exports every third-party driver, including:
- Chipset drivers
- Graphics drivers
- Audio drivers
- Network adapters
- USB controllers
- Storage controllers
- Bluetooth drivers
Depending on how many drivers are installed, this process usually takes one to two minutes.
After it finishes, open: C:\WorkSpace\Drivers
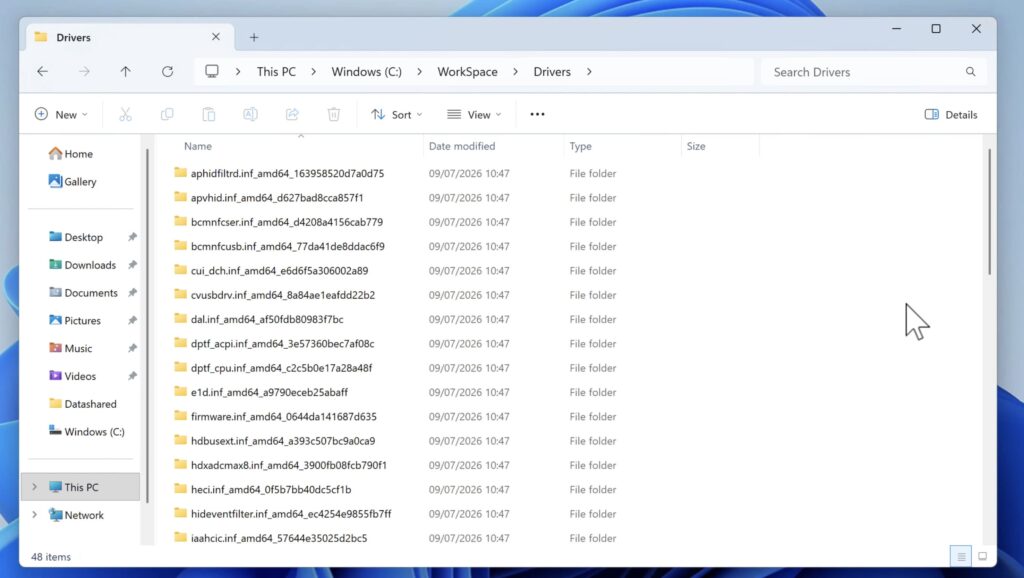
You’ll see folders containing the exported driver packages.
Step 3: Extract the Windows ISO
Mount your Windows ISO by double-clicking it or right-clicking and selecting Mount.
Windows creates a virtual DVD drive.
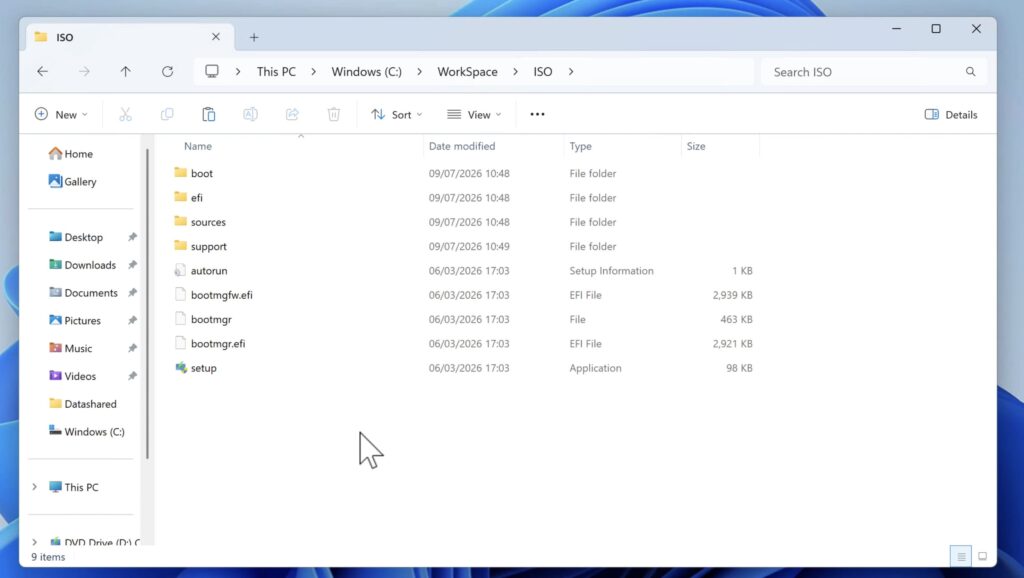
Open the mounted drive, select every file and folder, then copy everything into: C:\WorkSpace\ISO
Wait until all files finish copying.
Step 4: Remove the Read-Only Attribute
Files copied from a mounted ISO remain marked as read-only, preventing DISM from modifying them.
Run:
attrib -r "C:\WorkSpace\ISO\sources\*" /s /dThis removes the read-only attribute from every file inside the sources folder.
Skipping this step often leads to confusing DISM errors later in the process.
Step 5: Find the Windows Edition Index
A Windows installation image typically contains several editions, such as:
- Home
- Pro
- Education
- Enterprise
Each edition has its own index number.
To display them, run:
dism /Get-WimInfo /WimFile:C:\WorkSpace\ISO\sources\install.wimDISM displays information similar to:
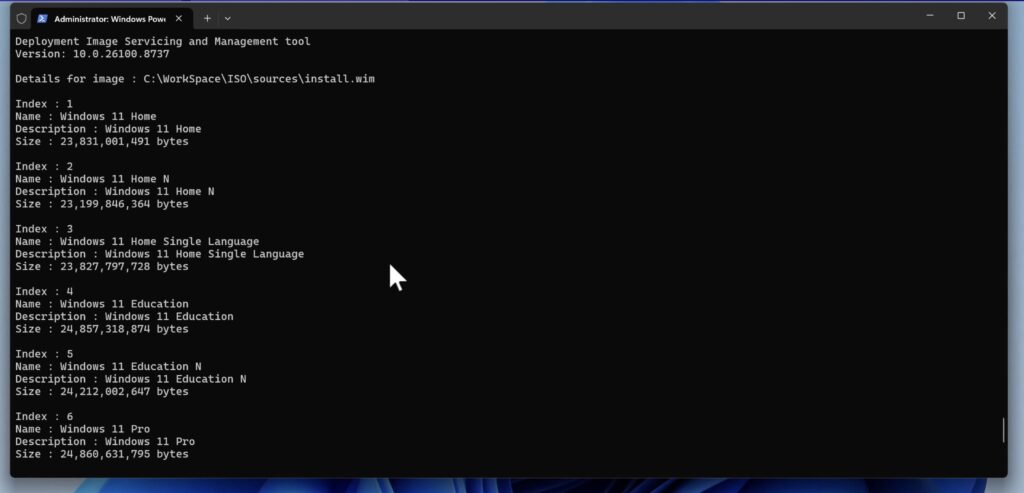
Write down the index number for the edition you want to customize.
Note: The index varies depending on the Windows ISO you’re using.
Step 6: Mount the Windows Image
Replace 6 with your edition’s index number.
dism /Mount-Image /ImageFile:C:\WorkSpace\ISO\sources\install.wim /Index:6 /MountDir:C:\WorkSpace\MountDISM mounts the selected Windows edition into the Mount folder.
The process usually takes between two and five minutes.
Once finished, the Windows image becomes accessible for modification.
Step 7: Inject Your Drivers
Now add all exported drivers into the mounted image.
Run:
dism /Image:C:\WorkSpace\Mount /Add-Driver /Driver:C:\WorkSpace\Drivers /RecurseDISM searches every subfolder for .INF driver files and integrates them into the Windows image.
Each injected driver is displayed as the command runs.
The more drivers you have, the longer this process will take.
Step 8: Save the Changes
Once the drivers have been added successfully, save the modified image:
dism /Unmount-Image /MountDir:C:\WorkSpace\Mount /CommitThe /Commit option writes all changes back into install.wim.
Without it, every injected driver would be discarded.
This step can take several minutes depending on the image size.
When finished, the Mount folder becomes empty again.
Step 9: Rebuild the Bootable ISO
Now it’s time to create a new bootable Windows ISO.
Install ImgBurn, then launch it as Administrator.
Choose:
Create image file from files/folders
Configure the project using these settings.
Source : C:\WorkSpace\ISO
Destination
Choose where to save the new ISO, for example: C:\WorkSpace\Custom_Windows_Drivers.iso
Boot Settings
Open:
Advanced → Bootable Disc
Enable: Make Image Bootable
Browse to: C:\WorkSpace\ISO\boot\etfsboot
Set: Sectors to Load = 8
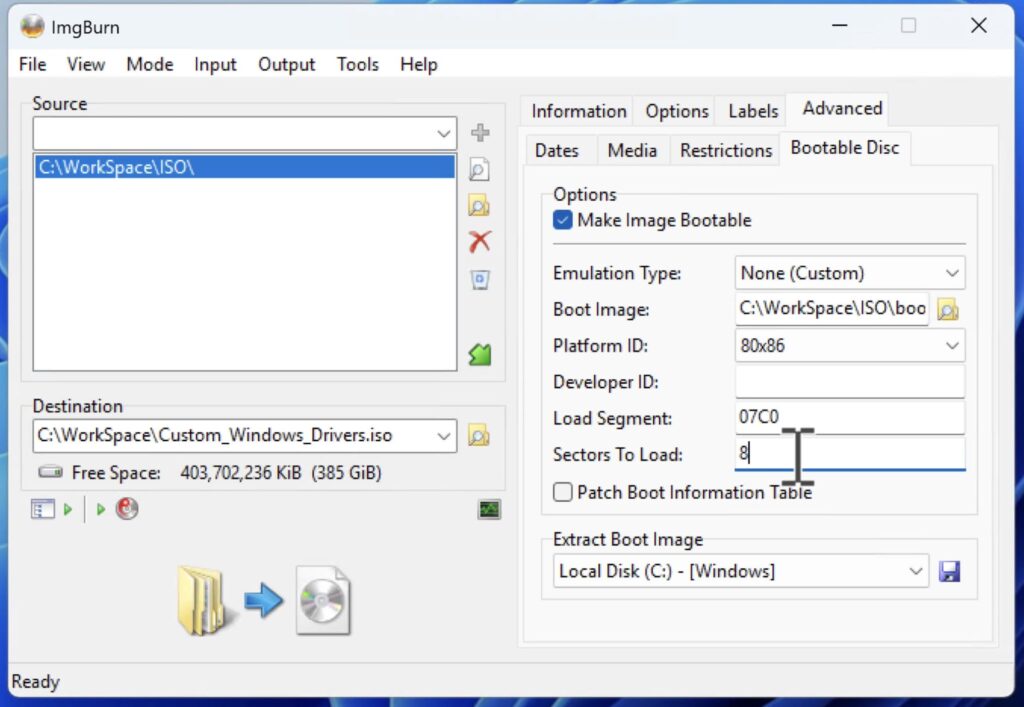
Start the build process.
ImgBurn creates a brand-new bootable Windows ISO containing your integrated drivers.
Step 10: Test the ISO
Before installing Windows on a real computer, test your ISO inside a virtual machine.
You can use:
- VMware Workstation
- Oracle VirtualBox
Create a new virtual machine and select your custom ISO as the installation media.
Verify that:
- Windows Setup starts correctly
- The ISO boots without errors
If you’re using VirtualBox, ensure the VM configuration matches your ISO’s boot mode. If you’ve built a BIOS/Legacy bootable ISO, disable EFI in the VM settings; otherwise, the virtual machine may fail to boot.
Testing only takes a few minutes and can save you from discovering boot problems during a real installation.
Step 11: Install Windows
Once you’re satisfied that everything works, write the ISO to a USB drive using:
- Rufus
- Ventoy
Boot your target computer from the USB drive and install Windows normally.
When Windows reaches the desktop, your hardware drivers are already installed.
That means:
- No missing network driver
- No yellow exclamation marks in Device Manager
- No searching for manufacturer downloads
- Minimal post-installation work
Usually, all that’s left is installing the latest Windows Updates.
Why Create a Driver-Integrated Windows ISO?
A custom Windows ISO offers several advantages:
- Faster Windows installations
- Automatic driver installation
- No internet required for initial drivers
- Ideal for repeated clean installs
- Perfect for deploying Windows to identical computers
- Saves time after every reinstall
If you regularly maintain the same PC or multiple systems with the same hardware, creating a customized installation image is well worth the effort.
See also: Convert MBR to GPT Without Data Loss
Commands Used
Export Drivers
Export-WindowsDriver -Online -Destination "C:\WorkSpace\Drivers"Remove Read-Only Attribute
attrib -r "C:\WorkSpace\ISO\sources\*" /s /dView Windows Editions
dism /Get-WimInfo /WimFile:C:\WorkSpace\ISO\sources\install.wimMount the Image
dism /Mount-Image /ImageFile:C:\WorkSpace\ISO\sources\install.wim /Index:6 /MountDir:C:\WorkSpace\MountInject Drivers
dism /Image:C:\WorkSpace\Mount /Add-Driver /Driver:C:\WorkSpace\Drivers /RecurseSave Changes
dism /Unmount-Image /MountDir:C:\WorkSpace\Mount /CommitFinal Thoughts
By combining PowerShell and DISM, you can create a customized Windows installation image that already contains all the drivers your hardware needs. This eliminates one of the most time-consuming parts of reinstalling Windows and makes future deployments much faster and more reliable.
Once you’ve built your custom ISO, keep it in a safe place. The next time you need to reinstall Windows on the same hardware, you’ll have a streamlined installation process with your drivers ready from the moment Windows starts.
If you encounter issues during the process, the most common causes are a read-only ISO, an incorrect image index, or an improperly configured bootable ISO. Double-check each step, and you’ll have a fully functional driver-integrated Windows installer ready for your next deployment.
Pingback: How to Download and Install Windows 11 26H2 Preview on an Unsupported PC