
Forgetting your Windows 11 password can feel like being completely locked out of your digital life. Your files, apps, and work become inaccessible, and if you don’t have a recovery USB, it seems like there’s no solution.
The good news is that you can create a bootable Windows 11 password reset USB from scratch using free official Microsoft tools and regain access to your PC without losing your data.
In this guide, you’ll learn step-by-step how to build a Windows PE recovery USB and use it to reset or unlock a local Windows account password.
Important Disclaimer
This method works only for local Windows accounts (accounts created directly on the PC).
If you are using a Microsoft account, reset your password here:
https://account.microsoft.com
This guide is intended only for personal computers you own or are authorized to access.
Requirements (What You Need)
Before starting, make sure you have:
- A working Windows PC (for creating the USB tool)
- A USB flash drive (minimum 1GB, will be erased)
- Windows ADK (Assessment and Deployment Kit)
- Windows PE Add-on for ADK
- NTPWEdit (free password editor tool)
- Rufus USB bootable tool
Download Rufus here: https://rufus.ie
Step 1: Install Windows ADK and Windows PE
First, download and install the Windows ADK for Windows 11.
During installation:
- Select only Deployment Tools
- Complete the installation
Next, install the Windows PE Add-on using default settings.
These tools allow you to build a lightweight Windows recovery environment.
Step 2: Download NTPWEdit
NTPWEdit is a small utility that allows you to reset or remove Windows local passwords.
- Download the ZIP file
- Extract it to your Desktop
Keep this folder accessible for later.
Step 3: Build Windows PE Recovery Environment
Open:
Deployment and Imaging Tools Environment (Run as Administrator)
Then run the following commands:
Create WinPE working directory
copype amd64 C:\WinPE_amd64Mount Windows PE image
Dism /Mount-Image /ImageFile:"C:\WinPE_amd64\media\sources\boot.wim" /index:1 /MountDir:"C:\WinPE_amd64\mount"Add NTPWEdit to the system
Copy extracted NTPWEdit files into:
C:\WinPE_amd64\mount\Windows
C:\WinPE_amd64\mount\Windows\System32Save and unmount the image
dism /unmount-image /mountdir:"C:\WinPE_amd64\mount" /commitCreate bootable ISO file
MakeWinPEMedia /ISO C:\WinPE_amd64 C:\WinPE_amd64\WinPE_amd64.iso /bootexYour ISO file will be created here:
C:\WinPE_amd64\WinPE_amd64.isoStep 4: Create Bootable USB Using Rufus
Now transfer the ISO to a USB drive:
- Open Rufus
- Select your USB device
- Click Select and choose the WinPE ISO file
- Click Start
- Wait for the process to complete
Your Windows 11 password reset USB is now ready.
Step 5: Boot the Locked Windows PC
Insert the USB into the locked computer.
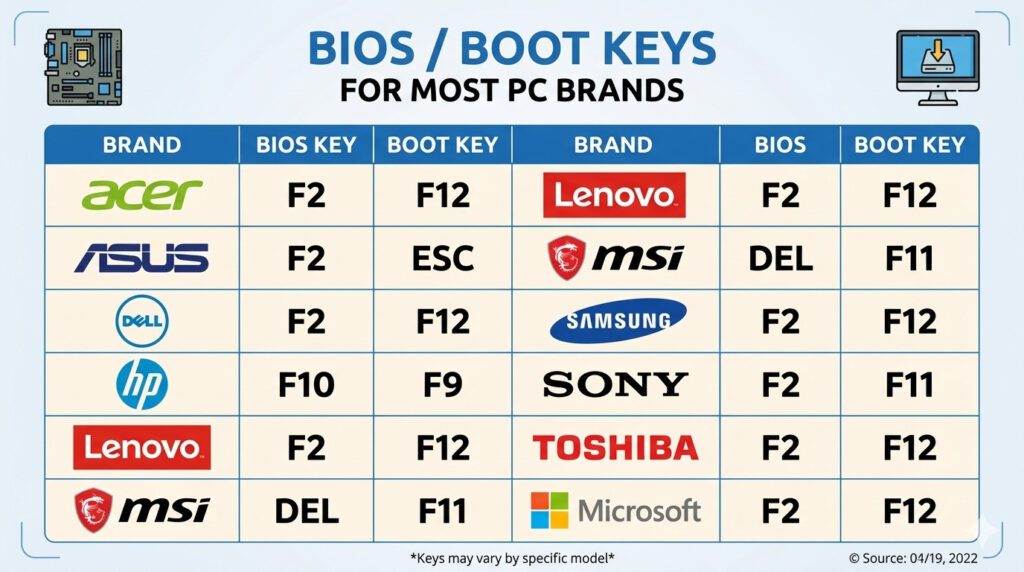
Restart and press the boot menu key:
- Dell: F12
- HP: F9 or F11
- ASUS: F8 or F9
Select your USB drive.
If it doesn’t boot:
- Enter BIOS (F2 or DEL)
- Disable Secure Boot temporarily
- Set USB as first boot device
Step 6: Reset Windows 11 Password
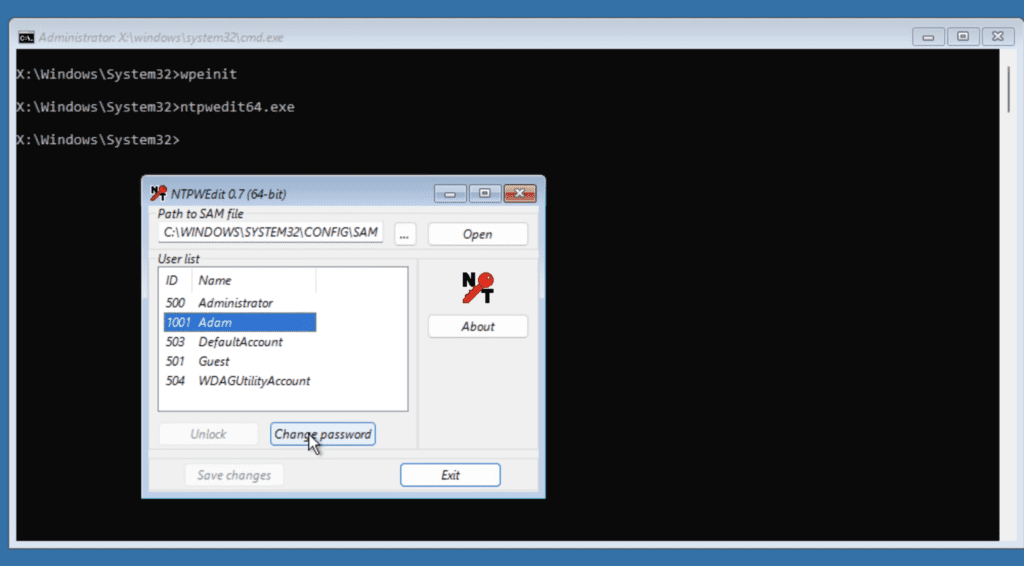
Once booted into WinPE, open Command Prompt and run:
ntpwedit64.exeInside NTPWEdit:
- Click Open
- Load the SAM database manually if needed:
- Select your user account
- Choose:
- Change Password OR
- Unlock Account
- Click Save Changes
Step 7: Reboot and Log In
Remove the USB drive and restart your PC.
Now log in using:
- Your new password, or
- A blank password (if cleared)
All your files and applications remain intact.
See also: How to Back Up All Windows Drivers Before Reinstalling Windows
Pro Tip: Keep the USB Safe
Label your USB:
Windows 11 Password Recovery Tool
Store it safely. It can be reused anytime you forget a password or help someone else recover access to their PC.
Conclusion
Creating a Windows 11 password reset USB may sound technical, but it’s actually a straightforward process when broken down step-by-step.
By using free Microsoft tools like Windows ADK, WinPE, and a lightweight password editor, you can build a powerful recovery tool that helps you regain access to your PC without reinstalling Windows or losing data.
